Key takeaways:
- Canva AI can swap your photo background and match the lighting
- You get multiple scene options and lighting controls
- It’s fast, easy, and looks real
Ever snap a pic and wish the background was just… better? I’ve been there. Canva now has an AI feature that doesn’t just erase the background—it actually puts your subject into a whole new scene and makes it look like they belong there. No more awkward cutouts or mismatched lighting. This guide will walk you through how to use Canva AI to change your photo background and make it look natural.
Canva AI’s New Background Swap Is Next Level
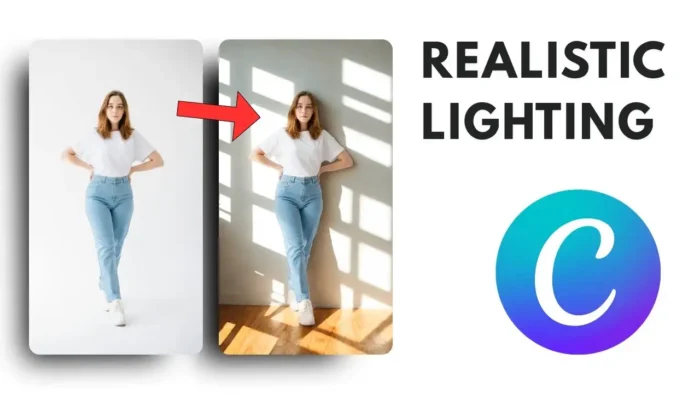
So Canva rolled out this AI-powered background generator. It’s not your basic remove background tool. This one actually figures out the subject, lets you pick a new scene, and then tweaks the lighting so your subject fits right in. The result? It doesn’t look fake or forced. It just looks like the photo was shot that way.
The wild part is, you don’t even need to know what background you want. Canva has an inspire me feature that’ll just throw out random scenes for you to pick from. And you can adjust the lighting on your subject so it matches the new vibe. Think of it as AI doing the heavy lifting, and you just picking what looks good.
Step-by-Step: Changing Photo Backgrounds With Canva AI
Upload Your Photo or Use Canva’s Stock
Start a new project in Canva. You can upload your own photo or grab one from their stock library. Just drag it onto your canvas and resize it how you want.
Want to compare before and after? Copy and paste your image so you can see the difference side by side.
Find the Background Generator
Click on the image you want to edit. Hit edit and look for the background generator button. This is where the magic happens.
Pick Your New Scene
You can type in what kind of background you want—like “beach at sunset” or “urban street.” If you’re not sure, hit inspire me and Canva will show you up to four random scene ideas. The AI works fast, and you’ll see the previews pop up in seconds.
Choose the Best Fit
Scroll through the four generated backgrounds and pick the one that feels right. Don’t stress—they all look pretty good, and you can always try again if none of them hit the mark.
Adjust the Lighting for Realism
Here’s what sets Canva apart: right after you pick a background, you’ll see a button to tweak the lighting on your subject. There are three options:
- None: No lighting change, just swaps the background
- Balanced: Adjusts the lighting a bit to match the new scene
- Maximum: Goes all-in to match the lighting so your subject looks like they were always in that place
Try them out. Maximum usually looks the most real, especially if your new background has dramatic light or shadows.
Compare Before and After
Put your original and edited photo side by side. You’ll see how the AI blends the subject into the new scene, matching shadows and highlights. It’s wild how natural it looks.
Tips for Getting the Best Results
- Use high-res photos for cleaner edges
- If the subject is complicated (like wild hair or lots of objects), try a few different backgrounds to see which one blends best
- Play with the lighting settings—sometimes balanced looks better than maximum if the new background is subtle
If you want to add more effects, like borders or highlights, Canva’s got tools for that too. Check out how to add and insert image borders in Canva or how to highlight text on Canva for extra style.
Why Canva AI Backgrounds Look So Real
The AI isn’t just slapping a new picture behind your subject. It’s analyzing the lighting, shadows, and even the color tone of your subject, then matching those to the new background. That’s why it looks like your subject belongs in the new scene, instead of floating awkwardly in front of it.
The tech behind it is probably similar to what you see in flux or imagine models, but Canva keeps the details under wraps. All I know is, it just works.
Use Cases: Who Needs This?
- Product shots for online stores—make your items pop with themed backgrounds
- Social media posts—add some flair without Photoshop skills
- Holiday cards—put your family in a winter wonderland, even if you’re in Miami
- Just for fun—see your pet in space, why not?
Limitations and What to Watch Out For
- Super detailed or messy backgrounds might confuse the AI a bit
- If your subject is really close to the edge of the frame, the lighting match might not be perfect
- Some backgrounds might look a little too “AI”—if that happens, just regenerate
If you want to go even deeper with photo editing, you might want to see how to make and design photo collages with Canva templates or how to print digital designs for free using Canva.
FAQs
How do I access the Canva AI background generator?
Click on your photo, hit edit, and look for the background generator button.
Can I upload my own background?
Right now, Canva AI generates the backgrounds for you, but you can always use the classic remove background and add your own image behind if you want.
Is this feature free?
Some AI features in Canva are free, but for unlimited use or higher-res exports, you might need Canva Pro.
Can I adjust the lighting after picking a background?
Yes, you get three lighting options so your subject matches the new scene.
What if I don’t like the generated backgrounds?
Just hit generate again or try typing a different scene idea. The AI gives you four new options each time.
👾 That’s it! Canva’s AI background swap is a game-changer for quick, pro-looking edits—no Photoshop skills needed.