Key takeaways:
- LUTs in Filmora give your video a new vibe fast
- Super simple, no need for deep color grading skills
- You can tweak LUT strength and protect skin tones 🎨
Ever feel like your video just looks flat? You want that cinematic punch, but messing with color grading sounds way too much. I get you. That’s where LUTs in Filmora come in. You can give your video a whole new style in seconds—no pro skills needed.
I’ll show you exactly how to use LUTs in Filmora, why it’s so much easier than traditional color grading, and how to keep your skin tones looking natural. If you want your edits to pop without the headache, keep reading.
Table of Contents
- What LUTs Are and Why Filmora Makes Them Easy
- Getting Started: Setting Up Your Filmora Workspace
- Loading Your Video and Finding the LUT Option
- Picking a LUT Preset and Seeing Instant Results
- Adjusting LUT Strength for the Perfect Balance
- Protecting Skin Tones with a Single Click
- Fine-Tuning: Other Color Tools in Filmora
- When to Use LUTs vs. Manual Color Grading
- Tips for Getting the Most Out of LUTs in Filmora
- Exporting Your Video After Applying a LUT
- Table: LUT Features in Filmora vs. Manual Color Grading
- Common Problems and Quick Fixes
- Wrapping Up: Why LUTs Are a Game-Changer for Casual Editors
- FAQs
- How do I add a LUT in Filmora?
- Can I adjust how strong the LUT effect is?
- What does Protect Skin Tone do?
- Do I need to use other color tools with LUTs?
- Will LUTs slow down my export?
What LUTs Are and Why Filmora Makes Them Easy
LUT stands for Look Up Table. It’s a shortcut for changing the color and feel of your video. Think of it like an Instagram filter, but way more powerful and customizable. In Filmora, you don’t need to mess with complicated settings—just pick a LUT, adjust the strength, and you’re set.
If you’re curious about more color grading options in Filmora, check this out: color grading Filmora.
Getting Started: Setting Up Your Filmora Workspace
I’m using Filmora version 14, but this works in any recent version. The layout might look a little different depending on your mode (classic or default), but the steps are the same. I switched to the default layout for this, so the edit menu pops up on the right side. If you’re still on classic, you’ll just click the edit icon instead.
Loading Your Video and Finding the LUT Option
Drop your video clip onto the timeline. For this demo, I used a group of people eating ice cream—because who doesn’t love ice cream? 🍦
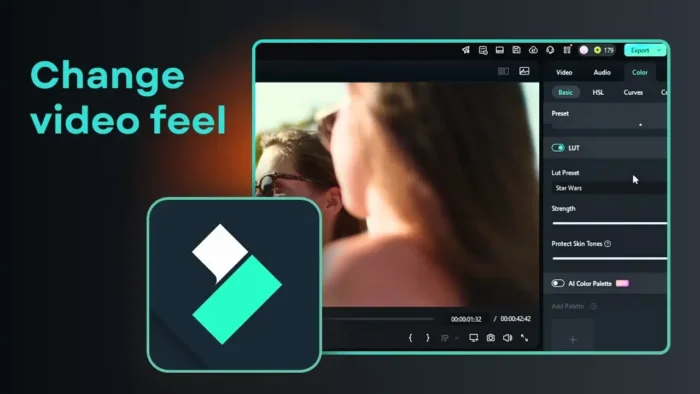
Click your clip, and the edit menu pops up. Head to the color section, then hit basic. Here’s where you find the LUT option. It’s right there, no digging required.
Picking a LUT Preset and Seeing Instant Results
Filmora gives you a bunch of LUT presets. Scroll through and pick one that fits your vibe. I tried the Star Wars preset for fun. It made the colors less saturated, which can look cool for a moody scene. If it feels too much, don’t stress—you can dial the strength up or down.
Adjusting LUT Strength for the Perfect Balance
Sometimes a LUT is too strong or too subtle. Filmora lets you slide the strength from zero to max. I usually start in the middle and tweak until it feels right. You get instant feedback, so you can see what works.
Protecting Skin Tones with a Single Click
Here’s a feature I love: Protect Skin Tone. Ever use a filter that makes people look like aliens? Yeah, not cute. Turn on Protect Skin Tone, and you can keep faces looking natural while the rest of the shot gets the LUT treatment. You can even adjust how strong this protection is.
Fine-Tuning: Other Color Tools in Filmora
If you want to go deeper, Filmora has more tools like HSL, color wheels, and curves. But honestly, for most edits, LUTs do the job. They’re fast, easy, and look great.
Want to go even further and improve your video quality? Here’s a guide that covers more tricks: how to improve video quality in Filmora.
When to Use LUTs vs. Manual Color Grading
LUTs are perfect for quick edits, social media, or if you’re just starting out. Manual color grading is for when you want full control and have time to spare. Most casual editors stick with LUTs—they get you 90% of the way with almost zero effort.
Tips for Getting the Most Out of LUTs in Filmora
- Try different presets for different scenes. Sometimes a LUT that looks weird on one clip looks awesome on another.
- Always check your skin tones. Use the Protect Skin Tone slider if things look off.
- Combine LUTs with other Filmora effects for unique results.
- Save your favorite LUT settings for next time.
Exporting Your Video After Applying a LUT
Once you’re happy, export your video as usual. Filmora keeps everything smooth. If you want to record your screen or need more Filmora tips, check this: record desktop screen Filmora.
Table: LUT Features in Filmora vs. Manual Color Grading
| Feature | LUTs in Filmora | Manual Color Grading |
|---|---|---|
| Speed | Super fast | Slow, detailed |
| Skill level needed | Beginner | Intermediate/Advanced |
| Skin tone protection | Built-in slider | Manual, tricky |
| Customization | Preset + strength | Full manual control |
| Best for | Quick edits, social | Commercial, pro work |
Common Problems and Quick Fixes
- LUT too strong? Lower the strength slider.
- Skin tones look weird? Turn on Protect Skin Tone.
- Can’t find LUT option? Make sure you’re in the color section under basic.
Wrapping Up: Why LUTs Are a Game-Changer for Casual Editors
You don’t need to be a color grading nerd to make your videos look fresh. LUTs in Filmora are the shortcut. One click, a few tweaks, and your video looks like you spent hours on it. If you want to blur faces for privacy, check this: blur face Filmora.
FAQs
How do I add a LUT in Filmora?
Click your video, open the edit menu, go to color, then basic, and pick a LUT preset.
Can I adjust how strong the LUT effect is?
Yes, use the strength slider to make the LUT more or less intense.
What does Protect Skin Tone do?
It keeps people’s faces looking natural while the LUT changes the rest of the colors.
Do I need to use other color tools with LUTs?
No, but you can if you want more control. LUTs are usually enough for most edits.
Will LUTs slow down my export?
Nope, Filmora handles LUTs fast, so your export speed stays the same.
👾 Try it out, and your videos will never look boring again!
Citations:
- https://ppl-ai-file-upload.s3.amazonaws.com/web/direct-files/797345/2c65cbc8-fd8b-4097-b6fc-d6b679407186/Ultimate-ChatGPT-Banned-Words.txt
- https://ppl-ai-file-upload.s3.amazonaws.com/web/direct-files/797345/604b2c3a-9491-4933-9e6f-b194012cb05e/AG-URL-18-04-2025.CSV
- https://www.youtube.com/watch?v=xa6KEi1Ub5s
- https://www.reddit.com/r/Filmora/comments/1028bcs/how_do_i_import_a_lut_into_filmora_12/
- https://www.bouncecolor.com/blogs/tutorials/filmora-luts
- https://filmora.wondershare.com/topic/guide-to-luts.html
- https://filmora.wondershare.com/get-creative/add-luts-to-video.html
- https://www.youtube.com/watch?v=z6HKvBCEx9Q
- https://www.youtube.com/watch?v=BSPH0nBpA5I
- https://filmora.wondershare.co.id/get-creative/add-luts-to-video.html
- https://www.reddit.com/r/Filmora/comments/1b81979/can_a_transition_apply_to_only_a_selected_clip/
- https://www.reddit.com/r/Filmora/comments/tmvc84/exporting_in_916_gives_a_letterbox_on_the_sides/
- https://www.presetsplanet.com/how-to-install-luts-in-filmora/
- https://www.youtube.com/watch?v=_MPIBItR2vI
- https://filmora.wondershare.co.id/master-class/add-cinematic-effects-in-filmora.html
- https://www.youtube.com/watch?v=cpSMf45l2RA
- https://www.reddit.com/r/osmopocket/comments/1axcn4i/is_there_software_to_add_luts_on_android_i/
- https://www.reddit.com/r/ios/comments/133ztdg/video_editor_on_ios_where_i_can_use_my_own_lut/
- https://www.reddit.com/r/fujifilm/comments/110skwp/to_skip_color_editing_is_there_a_lut_for_flog_to/
- https://www.reddit.com/r/GalaxyS23/comments/18pvx6k/videos_shot_in_hdr10_gets_washed_out_color_after/
- https://www.reddit.com/r/bmpcc/comments/1bj58gl/free_luts/
- https://www.reddit.com/r/Filmora/comments/vrjqvc/how_can_i_edit_my_webcam_make_it_like_this_full/
- https://www.reddit.com/r/Filmmakers/comments/ji4da9/i_created_a_cinematic_lut_pack_with_6_luts_for/
Answer from Perplexity: pplx.ai/share

