Since Android 9 Pie, Google has added a number of security and privacy features. One of them is the ability to switch to a private DNS that makes your browsing experience secure.
If you want to enable Private DNS from Cloudflare 1.1.1.1 on your Android Phone, then check out this guide! Make sure your phone is running Android 9 Pie or above. In this guide, I’m using Android 10 as a reference.
Table of Contents
- Enabling Private DNS 1.1.1.1 on Android
- How to use 1.1.1.1 DNS on Android 8 or older
- How to fix “DNS_PROBE_FINISHED_NXDOMAIN” error?
- Does Private DNS work on mobile data, or only on Wi-Fi?
- Can I use Private DNS with a VPN on my Android device?
- How do I switch back to regular DNS after enabling Private DNS 1.1.1.1?
- Benefits of 1.1.1.1 DNS
- FAQs
Enabling Private DNS 1.1.1.1 on Android
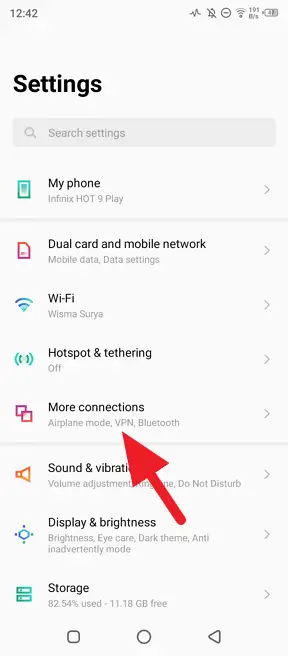
1. Go to Android Settings and select More connections. For Android 12 or above, select Network & internet.
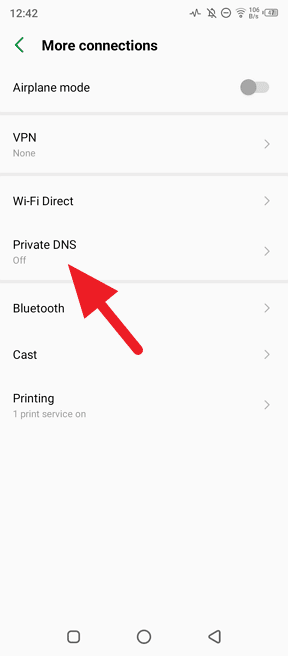
2. Tap on Private DNS.
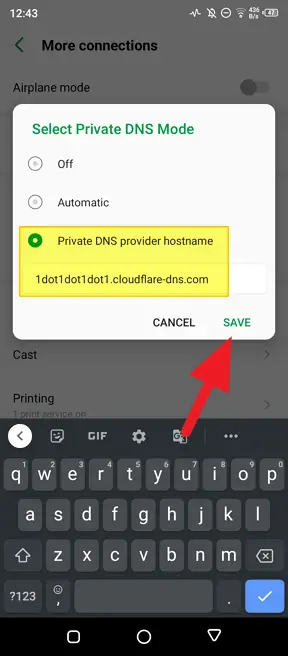
3. Select Private DNS provider hostname. Enter 1dot1dot1dot1.cloudflare-dns.com and hit Save.
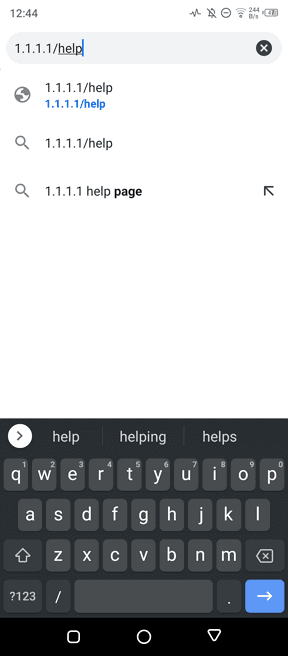
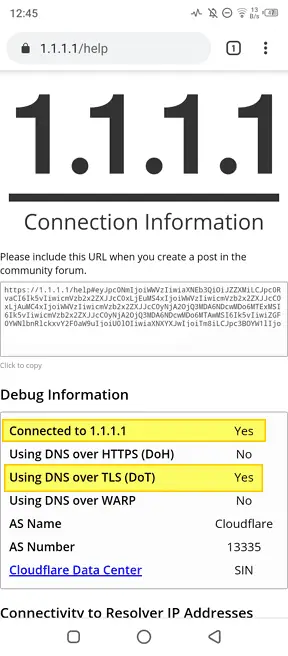
4. Now, to check if the DNS has enabled, visit 1.1.1.1/help via a browser.
5. Make sure “Connected to 1.1.1.1” and “Using DNS over TLS (DoT)” are Yes.
Now you can browse with better security and privacy. The Cloudflare 1.1.1.1 may be even faster than your internet provider’s DNS. It can also be used to open blocked websites without a VPN — for free!
How to use 1.1.1.1 DNS on Android 8 or older
On older versions of Android, you’ll need to manually set 1.1.1.1 as the DNS server for each WiFi network. Here is how you can do it:
- Long press on the WiFi name and select Modify network
- Check Show advanced options
- Change IP settings to Static
- Set DNS 1 to 1.1.1.1
This is more tedious, but it still allows you to use 1.1.1.1 as your DNS.
Another alternative is using the 1.1.1.1 app, which makes it easy to enable both 1.1.1.1 DNS and their WARP VPN service. WARP encrypts all your device’s Internet traffic for full privacy protection.
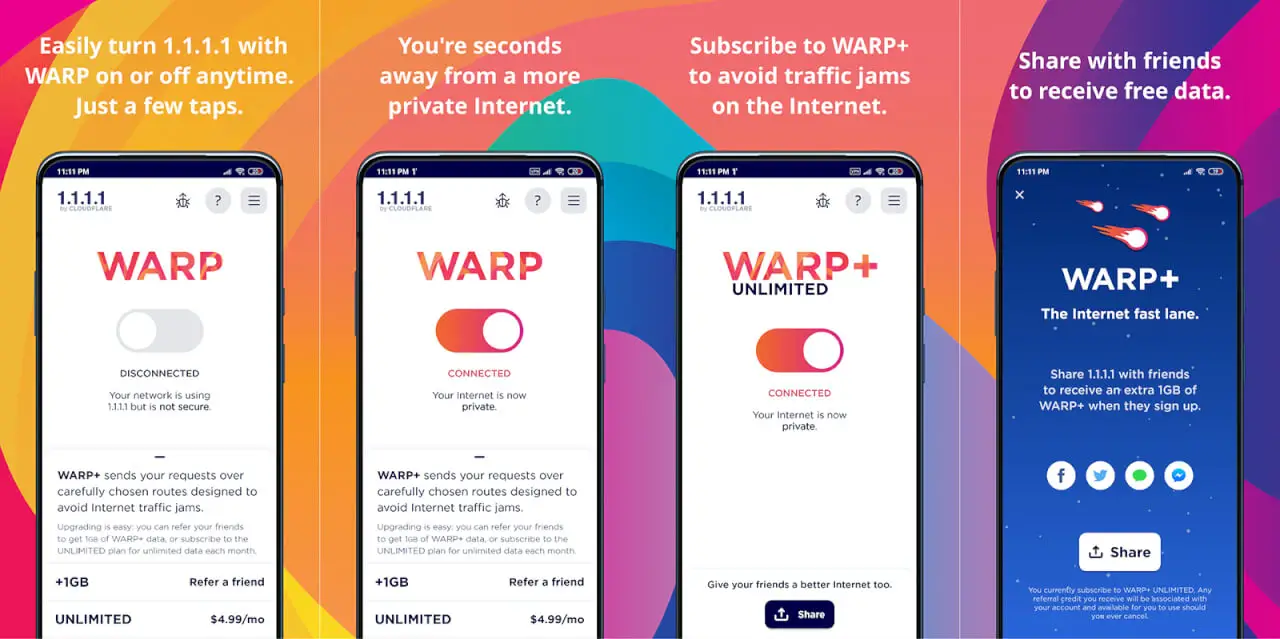
The app has three modes:
- DNS only – Only routes DNS via 1.1.1.1 for basic privacy
- WARP – Encrypts traffic but doesn’t hide IP address
- WARP+ – Full VPN protection and IP hiding
How to fix “DNS_PROBE_FINISHED_NXDOMAIN” error?
Here are the key steps to fix the “DNS_PROBE_FINISHED_NXDOMAIN” error when trying to enable Private DNS 1.1.1.1:
- Flush the DNS cache on your device. On Android, go to Settings > Network & Internet > Advanced > Private DNS and tap on “Flush DNS cache”. On iOS, go to Settings > General > Reset > Reset Network Settings.
- Renew your device’s IP address. On Android go to Settings > Network & Internet > Advanced > Private DNS and tap on “Renew lease”. On iOS, go to Settings > Wi-Fi > Click the “i” icon next to your network > Renew lease.
- Change the DNS servers on your device. On Android, go to Settings > Network & Internet > Advanced > Private DNS and enter “one.one.one.one” as the Private DNS provider hostname. On iOS, go to Settings > Wi-Fi > Click the “i” icon next to your network > Configure DNS > Manually enter “1.1.1.1”.
- Reset app preferences. On Android, go to Settings > Apps > See all apps > Chrome > Storage > Clear Cache and Clear Data. On iOS, go to Settings > General > Reset > Reset Network Settings.
- Restart your device. Sometimes, this may help.
- Try enabling Private DNS 1.1.1.1 again.
If the issue still persists, check if the website domain is active and properly configured. You can also try changing to a different DNS server like Google (8.8.8.8, 8.8.4.4).
As a last resort, contact your internet service provider for assistance.
Does Private DNS work on mobile data, or only on Wi-Fi?
Private DNS works seamlessly on both Wi-Fi and mobile data connections once enabled in the settings on Android 9 and above. It provides encryption and prevents manipulation of DNS queries on all network connections for better privacy and security.
Can I use Private DNS with a VPN on my Android device?
Yes, it is possible to use Private DNS with a VPN on Android devices. If you set a Private DNS provider and connect to a VPN at the same time, the DNS queries will go through the VPN tunnel.
This means the DNS provider will only see the IP address of the VPN server you are connected to, not your real IP address.
How do I switch back to regular DNS after enabling Private DNS 1.1.1.1?
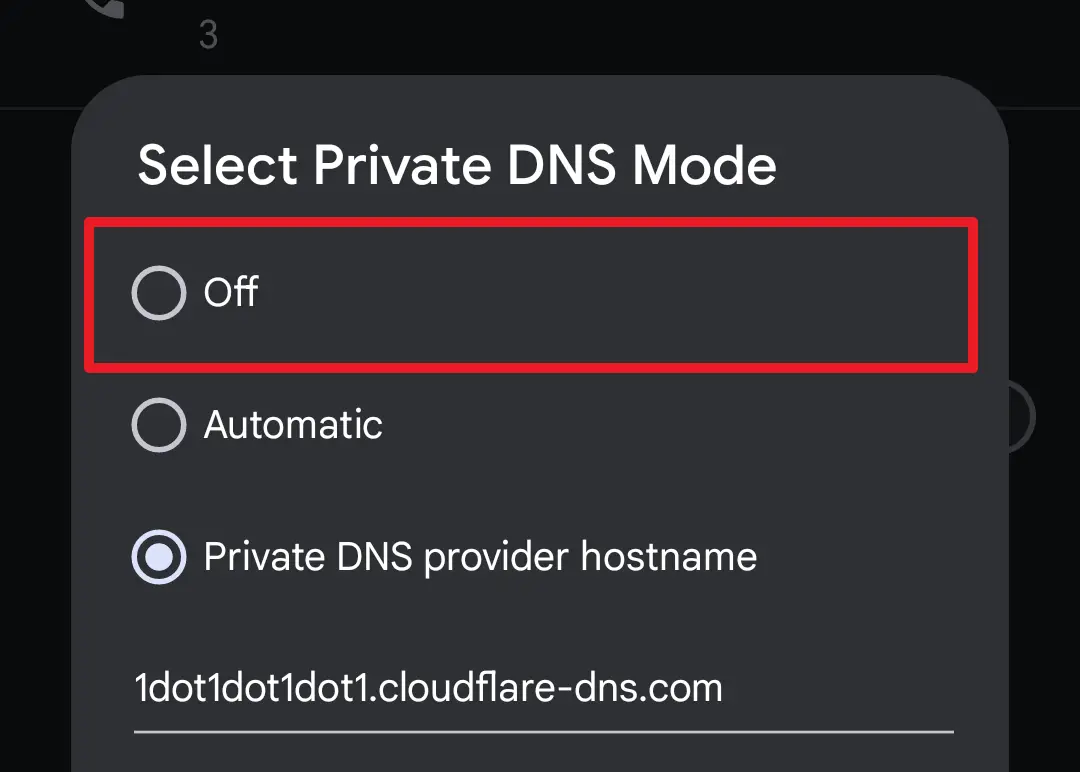
Here are the steps to switch back to regular DNS after enabling Private DNS 1.1.1.1 on an Android device:
- Open the Settings app on your Android device.
- Tap on “Network & internet”.
- Tap on “Advanced”.
- Tap on “Private DNS”.
- Tap on “Off” to disable private DNS and go back to using your regular DNS. You can also manually enter your previous DNS servers instead.
- Tap “Save” to confirm the changes.
This will disable the 1.1.1.1 DNS and revert your device to using the default DNS provided by your WiFi network or carrier.
Benefits of 1.1.1.1 DNS
The 1.1.1.1 offers several benefits over your carrier’s default DNS:
- Privacy – 1.1.1.1 does not log or sell your browsing data. Your carrier likely uses your DNS information for ad targeting.
- Speed – 1.1.1.1 claims to be the fastest public DNS resolver, which can load websites faster.
- Security – 1.1.1.1 blocks threats and filters out malware, meaning you are less likely to be sent to malicious sites.
- Reliability – 1.1.1.1 has servers located around the world to ensure reliable DNS resolution.
FAQs
Is 1.1.1.1 free to use?
Yes, 1.1.1.1 provides free DNS resolution to all users. They offer a paid service called WARP+ for added protection and security.
Is 1.1.1.1 safe to use?
Yes, 1.1.1.1 is safe to use. It is run by Cloudflare, a major Internet infrastructure company. Cloudflare been known for its strong commitment to privacy and security.
Will 1.1.1.1 slow down my Internet speed?
No, in most cases using 1.1.1.1 will have minimal impact on Internet speeds. Its servers are highly distributed so latency should remain low. Some users even report speed increases after switching to 1.1.1.1.
What are the disadvantages of using 1.1.1.1?
The main disadvantage is that 1.1.1.1 only handles DNS traffic. It does not encrypt the rest of your Internet activity like a full VPN does. So your browsing history is still visible to your ISP and network operators.
Does 1.1.1.1 work in China or other restricted regions?
Unfortunately 1.1.1.1 does not work in China or other places that block access to major services like Google and Facebook. You would need a full VPN service to bypass these regional restrictions.


