Key takeaways:
- Use Recraft AI to add natural backgrounds to transparent images
- Adjust lighting, shadows, and frame for a pro look
- Export your finished image in PNG or JPEG
Ever have a product photo or a transparent image that just looks flat? That empty background isn’t doing your design any favors. I’ve been there—plain PNG files are everywhere, but they’re not eye-catching. In this post, I’ll show you how to use Recraft AI to add a realistic background to anything, making your images pop without looking fake.
You’ll see how easy it is to match lighting, shadows, and even aspect ratios, so your product or subject blends right in. No more boring cutouts—your visuals will feel way more natural and ready for any project.
Why Transparent Images Need a Real Background
Transparent images (PNG files) are super common for product displays, logos, or social posts. The problem? They look unfinished and out of place on most websites or marketing materials. If you just slap a product on a random background, it can look fake—wrong shadows, weird lighting, and no sense of space.
What you want is a background that feels like it belongs. That means matching the lighting, making sure the shadows are right, and thinking about how your subject fits into the scene. That’s where Recraft AI comes in.
Getting Started With Recraft AI for Backgrounds
Recraft AI is an online tool that lets you combine two images into one, but it’s smarter than just stacking layers. It analyzes your subject and the background, then merges them together so the result feels real. Here’s how I do it:
- Go to Recraft AI and start a new project
- Upload your transparent image (like a product photo or logo)
- Pick or upload a background image, or use a prompt to generate one
If you’re new to Recraft AI, you can sign up for free. The link’s usually in the video description or just search for the site.
Uploading Your Transparent Image
Drag and drop your transparent image into the project. You’ll see that it has no background—just the subject floating in space. This is your starting point.
Want to know how to make a transparent background in other apps? Check out how to make a layer transparent in GIMP.
Setting Up the Frame and Aspect Ratio
Click anywhere on the empty workspace and select Frame. This is where you’ll place your subject. You can resize the frame to fit your needs—vertical, square, or horizontal. Make your subject bigger or smaller as you like.
If your image is small, don’t stress. You can still add a background and adjust later.
Picking or Generating a Realistic Background
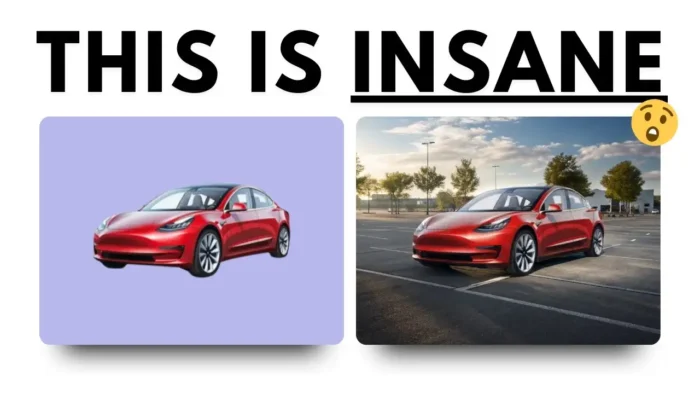
Now for the fun part. You can upload a background image or use a text prompt to generate one. For example, if you have a car photo, you might prompt: “empty parking lot during daylight.” The AI will create a background that matches your subject.
Tip: Use clear, simple prompts for best results. If you want more control, upload your own background photo.
Blending the Subject and Background
Select both your subject and the frame. Enter your prompt or pick your background. Hit Recraft Frame and let the AI do its thing. It’ll blend your subject with the background, taking lighting and shadows into account.
The cool part? Recraft AI creates a copy of your frame, so you can tweak the position or size of your subject without starting over.
Want to add overlays or effects to your finished image? Here’s a guide on how to add overlays in OBS.
Exporting Your Finished Image
Once you’re happy with the result, right-click on the image and export as PNG or JPEG. Now you’ve got a pro-looking image ready for your website, store, or social feed.
If you want to resize your image for different platforms, check out how to resize a picture on PC.
Pro Tips for Natural-Looking Backgrounds
- Match the lighting: If your subject is lit from the left, pick a background with light coming from the same direction.
- Watch the shadows: Make sure the shadows under your subject look natural and match the background.
- Use high-res images: Low-res subjects can look pixelated when enlarged.
- Keep it simple: Don’t overdo it with busy backgrounds—let your subject be the star.
Troubleshooting Common Issues
- Subject looks “cut out”? Try a different background or adjust the frame.
- Shadows don’t match? Move your subject or change the prompt for better lighting.
- Background too busy? Pick something simpler or blur the background a bit.
For more on fixing image issues, see how to fix pixelated photos.
Why Recraft AI Beats Manual Editing
Manual editing takes forever—matching shadows, erasing edges, adjusting colors. Recraft AI does all that for you, and it’s free. You don’t need Photoshop skills or expensive software.
If you’re curious about other ways to overlay images, check out how to put a transparent image over another image in Paint.
Use Cases: Where Realistic Backgrounds Matter
- Product photos for online stores
- Social media posts
- Marketing banners
- Thumbnails for YouTube or blogs
- Portfolio images
Adding a real background makes your images way more engaging and professional.
Quick Table: Steps to Add a Realistic Background
| Step | What To Do | Pro Tip |
|---|---|---|
| 1 | Upload transparent image to Recraft AI | Use high-res PNGs |
| 2 | Set up frame and adjust aspect ratio | Match your platform’s needs |
| 3 | Pick or prompt a background | Keep prompts simple |
| 4 | Select both and hit Recraft Frame | Let AI handle lighting/shadow |
| 5 | Export as PNG or JPEG | Ready for web or print |
More Resources
Want to up your editing game? Here are a few links that can help:
- How to make a brush in Photoshop
- How to add overlays in OBS
- How to resize a picture on PC
- How to fix pixelated photos
- How to put a transparent image over another image in Paint
FAQs
How do I get started with Recraft AI?
Just sign up for a free account on the Recraft AI website, upload your images, and follow the steps above.
What if my subject doesn’t look natural in the new background?
Check the lighting and shadows. Try a different background or move your subject within the frame.
Can I use my own background photo?
Yep, you can upload any photo as a background or use the prompt feature to generate one.
What file types can I export?
You can export as PNG or JPEG, which works for most uses.
Do I need Photoshop or any other software?
Nope, everything happens in your browser. If you want to do extra tweaks, you can always import your finished image into another editor.
Ready to give your images a fresh look? Try these steps and see the difference a real background makes! 🚀