Generally speaking, Microsoft Paint isn’t built to satisfy processional needs but rather a basic tool to help average users to edit their images. With that in mind, the program doesn’t offer a lot of functionalities that often needed these days, like inserting a transparent object on top of another image.
Paint does not support a tab system in which you can open multiple images within the program. Therefore, a clever workaround is necessary for the goal.
In this guide, you will learn how to make an image contains a transparent part and then move it to another image in Paint. Having a basic level of knowledge of using this program may be helpful.
1. Open an image in Paint. For example I’m going to take the ferret head into another image.
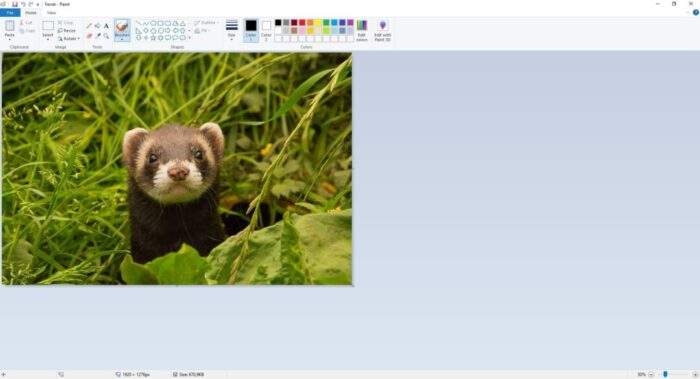
2. Now, under the Select tool, click Free-form selection.
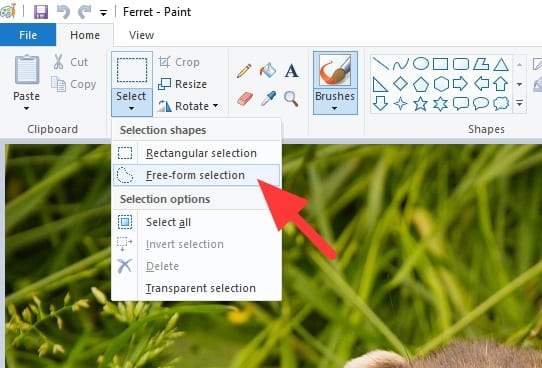
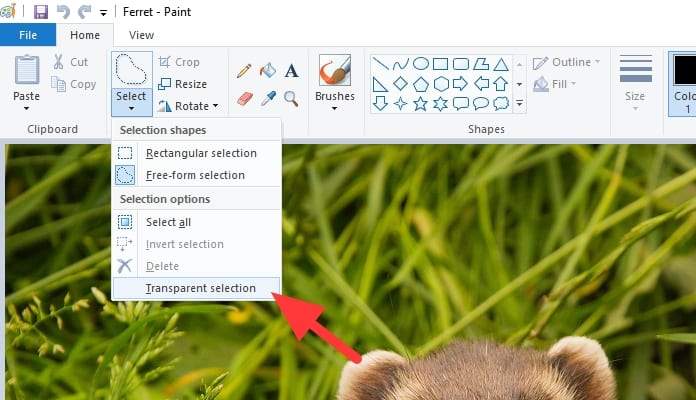
3. To enable transparency, go to Select > Transparent selection.
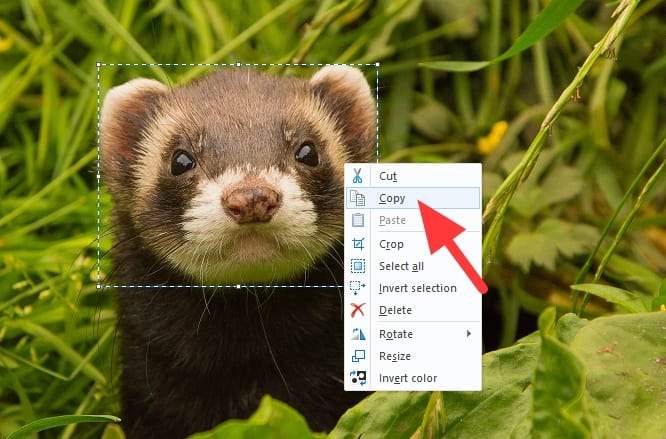
4. With the tool, isolate the area you want to keep.

5. Then right-click on it, select Copy.
6. Open a new image in Paint (you don’t have to save the previous image), and click Paste.
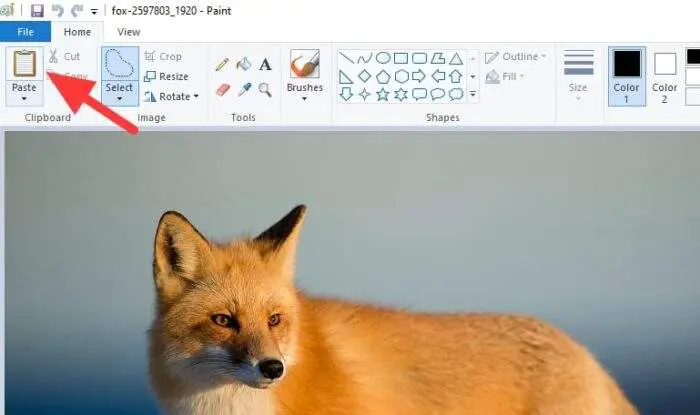
7. The ‘transparent’ image will appear.
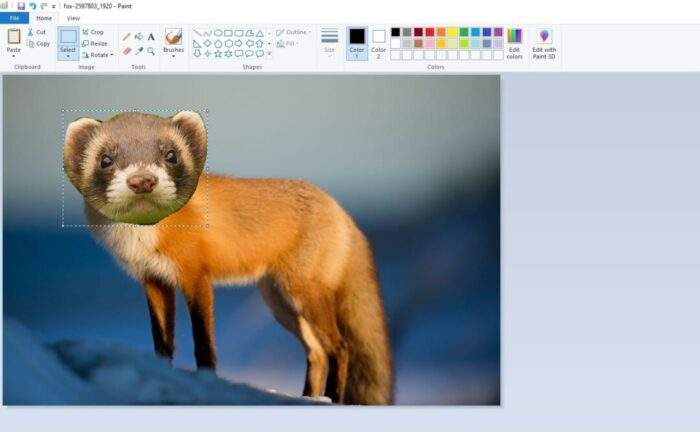
You may also paste the image to other programs and keep the transparency setting. However, Paint doesn’t support a perfect transparent background as Photoshop or GIMP does. Erasing the background will just pop out a white background even though you saved it as PNG or GIF.
For now, the only way to make an image background transparent is by inserting its isolated part on top of another image in Paint. Alternatively, you may create a transparent background with Paint 3D which is vastly more superior.
Table of Contents
Alternative Tools for Transparent Backgrounds
While Microsoft Paint is a handy tool for basic edits, its limitations can sometimes be frustrating. If you’re looking for more efficient ways to create transparent backgrounds or work with layered images, here are some excellent alternatives:
Paint 3D: A Step Up from MS Paint
For users on Windows, Paint 3D offers a more advanced set of features, including the ability to create true transparent backgrounds. Its Magic Select tool simplifies the process by automatically detecting the edges of your subject. Once isolated, you can save your image as a PNG file to preserve transparency. This feature makes Paint 3D a great option for users who want slightly more control without diving into professional-grade software.
Online Background Remover Tools
If you’re short on time or working with complex images, online tools like Remove.bg and Fotor can be lifesavers. These AI-powered platforms automatically detect and remove backgrounds in seconds. Simply upload your image, let the tool process it, and download the result as a PNG file.
Professional Software Options
For those who need precision and flexibility, software like Adobe Photoshop or GIMP is ideal. Both allow you to create transparent backgrounds using advanced tools like layers and masks. While Photoshop is a paid option, GIMP is free and open-source, making it accessible to everyone.
FAQ
Why does Paint add a white background instead of transparency?
Microsoft Paint’s “Transparent Selection” feature only works within the program itself and doesn’t support saving true transparency in exported images. When you save an image with transparency as a PNG or GIF in Paint, the transparent areas are replaced with white.
Can I use Paint 3D on older Windows versions?
Paint 3D is available for Windows 10 and later versions. If it’s not pre-installed on your device, you can download it from the Microsoft Store.
What’s the best free tool for creating transparent backgrounds?
For free options, tools like GIMP or online platforms such as Remove.bg are excellent choices. They offer more functionality than Paint while being user-friendly.
How do I ensure my image retains transparency when saved?
Always save your image in a format that supports transparency, such as PNG. Avoid formats like JPEG, which do not support transparent layers.
By exploring these alternatives and tips, you can achieve professional-looking results without the constraints of basic tools like Microsoft Paint!

