Your computer’s RAM (Random Access Memory) plays a vital role in its performance. Knowing details about your RAM such as its serial number, manufacturer, type, speed, etc. can be useful when troubleshooting issues, verifying authenticity, upgrading, or even selling your RAM modules.
This comprehensive guide will teach you multiple methods to find the serial number and other details of your RAM sticks without needing to open up your computer.
Table of Contents
Why Do You Need to Know the RAM Serial Number?
Here are some common reasons why you may need to lookup the serial number and other details of your RAM:
- Troubleshooting Performance Issues: Knowing your RAM specs can help narrow down software/hardware incompatibilities causing system instability or crashes.
- Verifying Authenticity: RAM serial numbers help verify whether a RAM stick is genuine or counterfeit. This is useful when buying/selling used RAM.
- Warranty Claims: RAM serial numbers are required for warranty claims in case your module gets damaged within the warranty period.
- Replacing Faulty RAM: If a RAM stick goes bad, you can use the serial number to find an exact replacement module.
- Upgrade Planning: Checking your current RAM specs helps determine compatible upgrades for capacity/speed.
Methods to Find RAM Serial Number in Windows
Windows provides multiple ways to lookup details about your installed RAM sticks without needing to open up your PC.
Using Command Prompt
The Command Prompt provides access to detailed RAM information through the wmic command.
Follow these steps:
- Press Windows key + R to open the Run dialog box.
- Type
cmdand press Enter to launch Command Prompt. - Enter the command
wmic memorychip get serialnumber, partnumber, devicelocator, manufacturerand press Enter.
This displays a table with the serial number, part number, slot location, and manufacturer for all RAM modules installed on your system.
Using Task Manager
Task Manager’s Performance tab shows high-level RAM details like capacity, speed, slots used, etc.
Follow these steps:
- Press Ctrl + Shift + Esc to open Task Manager.
- Go to the Performance tab.
- Check the Memory section on the right pane.
Using System Information
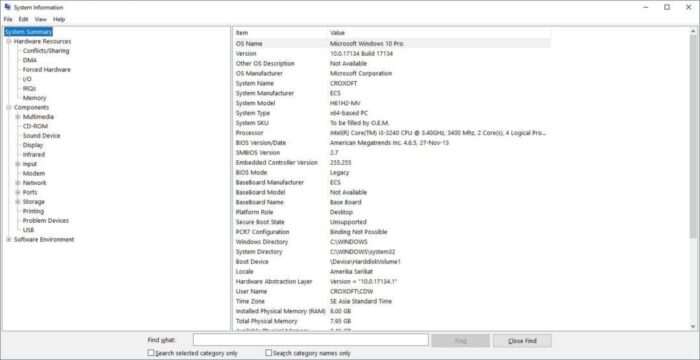
The System Information utility provides in-depth technical data about your computer’s hardware.
Follow these steps:
- Type
msinfo32in the Windows search box and press Enter. - Go to Components > Memory.
- Check the RAM modules list to view serial number, manufacturer, speed, etc.
Using Third-Party Tools
Apps like CPU-Z and Speccy can also help retrieve your RAM serial number and other specifications.
Such tools directly access and decode the RAM’s SPD data to show details like voltage, timings, clock speed, etc. They are especially useful for advanced users.
Finding RAM Details Physically
If the above software methods do not display the serial number, you will need to physically remove and check the RAM label instead.
Warning: Handle RAM sticks carefully to avoid damage from static discharge.
Follow these steps:
- Shut down your computer and disconnect power cables.
- Open the CPU cabinet and locate the RAM slots on the motherboard.
- Gently press the release clips on both sides of the RAM stick and pull it out vertically.
- Check the label sticker on the RAM for a serial number printed near the barcode.
- Note down the specifications before carefully reinserting the RAM back into the slot.
Conclusion
Finding your RAM serial number and other details is now easy on modern Windows PCs, without requiring physical access or hardware tools.
The wmic command provides the most convenient way to lookup RAM serial numbers from Command Prompt itself. Third-party system information utilities like CPU-Z and Speccy offer more advanced technical data as well.
Knowing your RAM specifics helps with computer troubleshooting, upgrades, warranty claims and ensures you get maximum performance.
So next time you need to find RAM serial numbers, use one of the simple methods listed in this guide to retrieve it right from within Windows.
Additional Insight: Ensuring RAM Compatibility and Performance
How to Choose the Right RAM for Your System
When planning a RAM upgrade or replacement, compatibility is key. Here are some essential factors to consider:
- Motherboard and Processor Support: Ensure your motherboard supports the RAM type (e.g., DDR4 or DDR5) and maximum capacity. Check your processor’s specifications for compatible memory speeds.
- Form Factor: Desktop PCs typically use DIMM modules, while laptops require SODIMM. Verify which form factor fits your system.
- Speed and Timings: Higher speeds (measured in MHz) can improve performance, but ensure your system supports the chosen speed. For advanced users, consider RAM timings for latency optimization.
- Dual-Channel Configuration: For better performance, install RAM sticks in pairs with identical specifications.
Pro Tip: Use tools like CPU-Z or consult your motherboard’s manual to confirm compatibility before purchasing.
Testing Your RAM for Stability
After upgrading or replacing RAM, it’s wise to test its stability. Tools like MemTest86 or Windows Memory Diagnostic can help identify potential issues. These tests ensure your new memory modules function correctly under load.
Recommended Products for RAM Upgrades
If you’re considering a purchase, explore options like DDR4 RAM modules on Amazon or SODIMM RAM for laptops. Always match the specifications to your system requirements.
FAQ
How do I know if my computer supports a RAM upgrade?
Check your motherboard’s manual or use tools like CPU-Z to identify supported memory types, maximum capacity, and available slots.
What is dual-channel memory, and why is it important?
Dual-channel memory allows two RAM sticks to work together for faster data transfer. It improves performance compared to single-channel configurations.
Can I mix different brands or sizes of RAM?
While possible, mixing different brands or sizes may lead to instability or reduced performance. It’s best to use identical modules for optimal results.
What should I do if my computer doesn’t recognize new RAM?
Ensure the modules are properly seated in the slots. Check compatibility with your motherboard and update the BIOS if necessary.
By following these guidelines and methods, you can confidently manage your computer’s memory upgrades and ensure peak performance!


