Key takeaways:
- Record voice-over in Filmora from the File menu
- Use AI Voice Enhancer for clearer, pro-sounding audio
- Tweak settings or use manual audio tools for more control
So you want to record your own voice in Filmora and make it sound crisp, clean, and just a bit more pro? 🎤 Maybe you’re working on a YouTube video, a tutorial, or just want your narration to stand out. I’ll walk you through the steps, show you how to use Filmora’s AI tools, and drop some tips for even better audio.
Table of Contents
- Recording Your Voice in Filmora Is Super Simple
- Making Your Voice Sound Better with Filmora’s AI Tools
- Step-by-Step: Recording and Improving Your Voice in Filmora
- Pro Tips for Recording Better Voice-Overs
- Table: AI Voice Enhancer Options in Filmora
- More Audio Tips for Filmora Creators
- FAQs
- How do I start recording my voice in Filmora?
- Can I use Filmora’s AI Voice Enhancer on any audio?
- What’s the difference between Voice Clarity and Voice Beautification?
- Do I need a special microphone to get good results?
- Can I improve my audio even more without AI?
Recording Your Voice in Filmora Is Super Simple
Recording voice-over in Filmora is pretty straightforward. You don’t need any fancy setup. Just a decent mic, Filmora, and a quiet room.
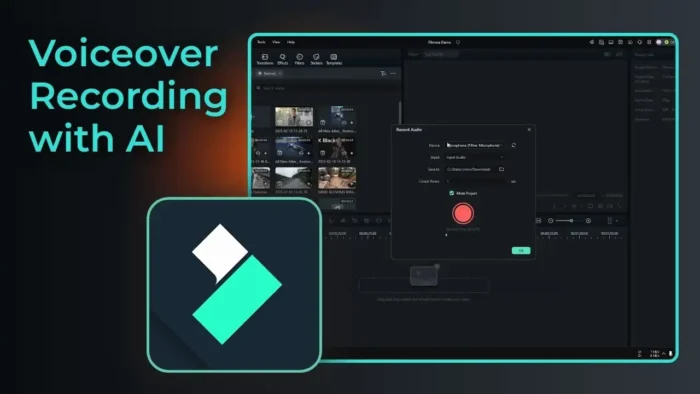
- Open Filmora, hit the File menu, and select Record Media.
- Click Record Voice Over. A new menu pops up called Record Audio.
- Pick your microphone. If you have more than one, choose the one with the best quality. (I always double-check this because my webcam mic sounds like a potato.)
- Leave the input audio setting on default. No need to mess with it unless you know what you’re doing.
- Choose where you want your audio file saved. I usually go with the Downloads folder because it’s easy to find.
- Set the countdown timer. I like 1 second, but you can do 3, 5, or 10 if you need a moment to get ready.
- Mute the project while recording unless you want to hear the video in the background. This keeps things clean.
Once you’re set, hit the red button and start talking. That’s it! Your audio will show up in the timeline automatically.
If you want to know how to record your screen in Filmora too, check out this step-by-step guide on recording your desktop screen with Filmora.
Making Your Voice Sound Better with Filmora’s AI Tools
Now, raw audio is rarely perfect. There’s always a bit of noise, maybe your voice sounds flat, or it just lacks that pro touch. This is where Filmora’s AI Voice Enhancer comes in clutch.
- Click on your audio clip in the timeline.
- Go to the Audio tab, then Basic.
- Enable AI Voice Enhancer.
You’ll see two options: Voice Clarity and Voice Beautification. I usually start with the default setting—it’s quick and does the job for most voices. If you want to get fancy, play with the sliders to match your own voice profile.
Play back your audio and compare. You’ll notice the difference. The AI filter cleans up background noise, boosts clarity, and gives your voice that “studio” vibe. 🎧
Want to go deeper? You can always adjust audio manually for even more control. If you’re curious about other ways to make your audio sound better in Filmora (without AI), there’s a bunch of manual tweaks you can try. For example, you can remove background noise in Filmora or improve video quality in Filmora for a more polished project.
Step-by-Step: Recording and Improving Your Voice in Filmora
1. Open the Voice Recorder in Filmora
Just go to File > Record Media > Record Voice Over. The Record Audio tool pops up. Easy.
2. Pick Your Microphone
If you have multiple mics, select the one you want. Don’t settle for the default if it’s not your best option.
3. Set Your Preferences
- Input audio: leave it alone unless you need something special.
- File location: choose a folder you’ll remember.
- Countdown: pick a delay that works for you.
- Mute project: keeps your recording clean.
4. Start Recording
Press the red button, wait for the countdown, and start talking. When you’re done, hit stop. Your voice clip drops right into the project.
5. Apply AI Voice Enhancer
Click your audio, go to Audio > Basic, and flip on AI Voice Enhancer. Try the default, then experiment with Voice Clarity and Voice Beautification if you want.
6. Fine-Tune If Needed
Still not happy? Try manual adjustments:
- Adjust volume and gain
- Use equalizer presets
- Remove background noise
Filmora gives you a lot of options if you want to get hands-on.
Pro Tips for Recording Better Voice-Overs
- Use a pop filter or at least talk past the mic, not straight into it. This cuts down on those p and b pops.
- Record in a quiet room. Turn off fans, AC, or anything that hums.
- If you mess up, don’t stop—just pause and start again. You can cut out mistakes later.
- Keep your mic at a steady distance. This keeps your volume consistent.
If you’re having issues with your mic or audio setup, you might want to check your sound card or make sure your mic is working right. Here’s a quick guide to fixing microphone level issues in Windows 10.
Table: AI Voice Enhancer Options in Filmora
| Option | What it Does | When to Use |
|---|---|---|
| Voice Clarity | Makes speech clearer, less muffled | For narration, tutorials |
| Voice Beautification | Adds warmth and polish | For vlogs, storytelling |
| Manual Adjustments | Full control over EQ, noise, etc. | For advanced users |
More Audio Tips for Filmora Creators
- If your audio is too quiet or too loud, adjust the gain in the audio settings.
- For background noise, use the Noise Removal tool. It’s not magic, but it helps.
- Want to add music? Keep it low so your voice stands out.
- For crossfades and smoother transitions, check out how to use audio crossfade in Filmora.
If you’re editing video too, you might want to blur faces in Filmora or add text to your videos for extra context.
FAQs
How do I start recording my voice in Filmora?
Just go to File > Record Media > Record Voice Over, pick your mic, and hit record. Your audio will show up in the timeline.
Can I use Filmora’s AI Voice Enhancer on any audio?
Yes, as long as it’s an audio clip in your project. Just select it, go to the audio settings, and turn on AI Voice Enhancer.
What’s the difference between Voice Clarity and Voice Beautification?
Voice Clarity is for making speech sharp and clear, while Voice Beautification adds warmth and makes your voice sound richer.
Do I need a special microphone to get good results?
Not really, but a decent USB microphone will sound way better than your laptop’s built-in mic. Just pick the best one you have.
Can I improve my audio even more without AI?
Absolutely. Try manual tweaks like noise removal, EQ, and volume adjustments. For more, check out how to remove background noise in Filmora.
Ready to make your voice sound pro in Filmora? Hit record, play with the AI tools, and see how much better your videos can sound. 🚀

