AMD offers Ryzen Balanced power plan for Windows users to get the most performance from their Ryzen CPU. This power plan is easily won against Windows’ default Balanced plan in terms of performance and efficiency.
Some say to get Ryzen Balanced plan, you need to install the latest CPU driver and Ryzen Master software. But I found this guide to be not quite right.
As it turns out, there is one more thing to do and in this guide, I will show you the ‘last step’ to get Ryzen Balanced plan. This guide applies to Windows 10 but should be fine on Windows 7 and Windows 8 as well.
After more than two years of using this mode, I can testify that the Ryzen Balanced power plan improves performance not only in gaming but also day to day productivity software. With that said, here’s you you can get this power profile.
Table of Contents
How to enable AMD Ryzen Balanced Power Plan
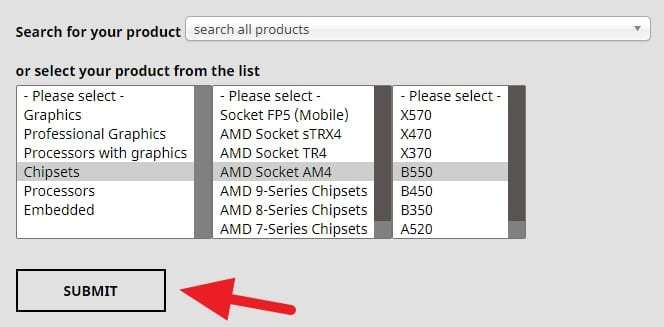
1. Go to AMD Drivers & Support page and select the chipset according to your motherboard, then click Submit. If you don’t know the motherboard version do you are using, you can find that on System Information.

2. Click Download on the AMD Chipset Drivers section.


3. Run the installer and wait for the hardware verification process.


4. Make sure “AMD Ryzen Power Plan” is checked, then click Install. It’s good to install all the features, but feel free to choose which one you need.


5. Wait for the installation process to finish.


6. Restart your computer. Make sure you have saved the ongoing tasks first.


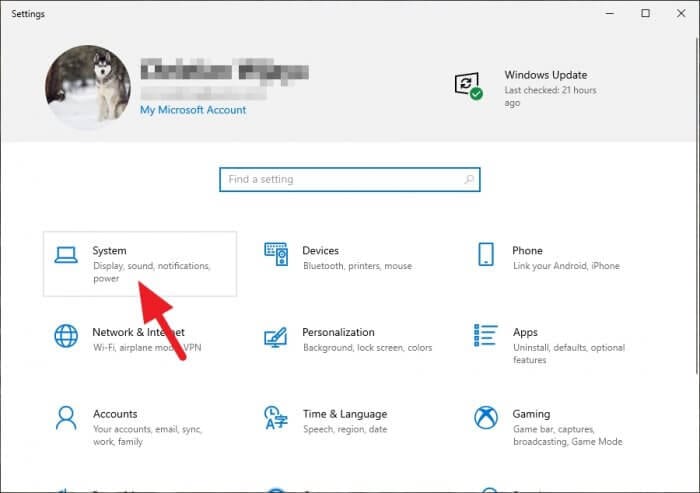
7. Now, go to Settings.


8. Select System.

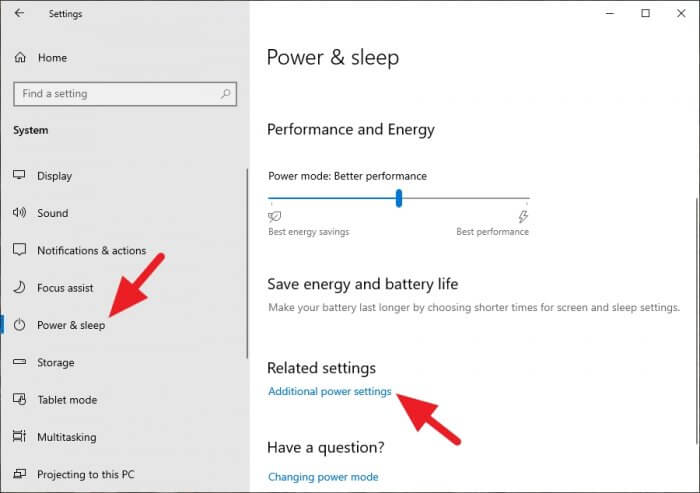
9. On Power & Sleep, click Additional power settings.

10. Select the AMD Ryzen Balanced option.
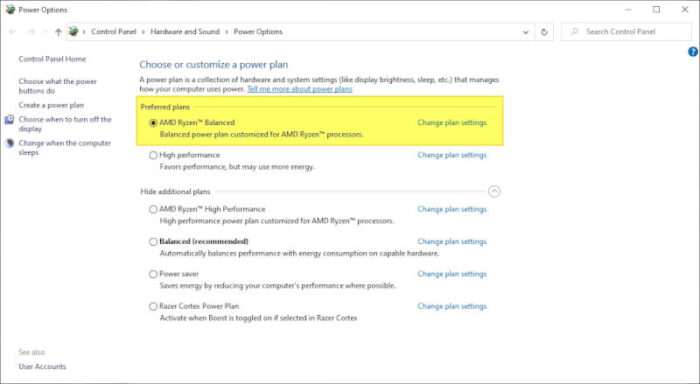

You can also select the AMD Ryzen High Performance plan, which would improve the performance, especially for gaming. But be aware that the power consumption will be higher too.
FAQs
How do I add a balanced power plan in Windows 10?
To add a balanced power plan in Windows 10, follow these steps:
1. Open the Start menu and type “Control Panel” to search for it.
2. Click on “Control Panel” in the search results to open it.
3. In the Control Panel window, change the “View by” option to “Large icons” or “Small icons” if it’s not already selected.
4. Look for and click on the “Power Options” icon.
5. In the Power Options window, you will see a list of power plans. Click on “Create a power plan” on the left-hand side.
6. A new window will appear. Choose the “Balanced” option and give your new power plan a name.
7. Click on “Next” and then “Create” to create the balanced power plan.
8. The new balanced power plan will now be added to your list of power plans.
You can select the balanced power plan by clicking on the battery icon in the system tray and choosing the power plan you want to use.
What is the Windows balanced power plan for Ryzen?
The Windows balanced power plan for Ryzen is called the Ryzen Balanced power plan, which is offered by AMD to get the most performance from their Ryzen CPU.
How do I access my AMD power plan?


To access your AMD power plan, you can open the Control Panel, select System and Security > Power Options, then you can choose either AMD Ryzen Balanced or AMD Ryzen High Performance.
Also, check out these simple steps that will increase gaming performance without upgrading hardware.

