Key takeaways:
- Filmora has both basic and advanced color grading tools
- AI color palette makes matching clip tones super easy
- Presets and LUTs help you get pro looks fast
Intro paragraphs:
Ever shot a video and felt like the colors just don’t pop? Or maybe your clips look like they’re from two different movies? 🎬 I’ve been there. Getting your videos to look consistent and pro can be a pain, but Filmora makes it way less intimidating—especially with the new AI color grading tools.
In this guide, I’ll walk you through how to use Filmora‘s color grading, from simple presets to the AI-powered color palette. You’ll see how to boost those colors, match your shots, and make your videos feel like they belong together.
Table of Contents
- Basic color grading in Filmora for beginners
- Using LUTs for a more cinematic look
- Advanced controls for fine-tuning your color
- Making your clips match with AI color palette
- Quick tips for experimenting with color grading
- When to use basic vs advanced vs AI
- Keeping your workflow smooth
- FAQs
- How do I apply a preset in Filmora?
- What’s the difference between a preset and a LUT?
- Can I match the color of two clips automatically?
- Is advanced color grading hard to learn in Filmora?
- Does Filmora support custom LUTs?
Basic color grading in Filmora for beginners
Let’s start with the basics. If you’re new to color grading, Filmora’s basic mode is your best friend. Just click on your video clip, head to the color tab, and you’ll see options like brightness, contrast, saturation, and temperature. These sliders are simple, but they can really change the vibe of your footage.
Say you’ve got a shot of a rice field, but the greens look washed out. Bump up the saturation or play with the temperature. You’ll see the color get richer right away. If you want to keep it super simple, just use a preset. Filmora comes with a bunch, and you can even save your own. One click, and your video looks way better.
Want more? Check out my guide on how to improve video quality in Filmora.
Using LUTs for a more cinematic look
If you want to go beyond the basics, Filmora also supports LUTs (Look-Up Tables). LUTs are like filters, but more advanced. They’re used in the film industry to give videos a specific mood or style. In Filmora, you’ll find some built-in LUTs inspired by popular movies.
Just open the LUT section, pick one, and see how your video changes. If you’re working with footage that has people in it, there’s a cool “protect skin tones” feature. Crank it up, and the skin colors stay natural while the rest of the image gets that cinematic treatment.
You can compare before and after with a single click. If you want to experiment, try different LUTs and see what fits your story.
Advanced controls for fine-tuning your color
If you feel like getting hands-on, Filmora has advanced tools too. You’ll find HSL (Hue, Saturation, Lightness) curves, color wheels, and more. These let you target specific colors and tweak them without messing up the whole shot.
For example, you can make just the greens more vibrant without changing the skin tones or the sky. Or you can shift the shadows to blue and highlights to orange for that blockbuster look. If you’re serious about color, these tools give you a lot of control.
Making your clips match with AI color palette
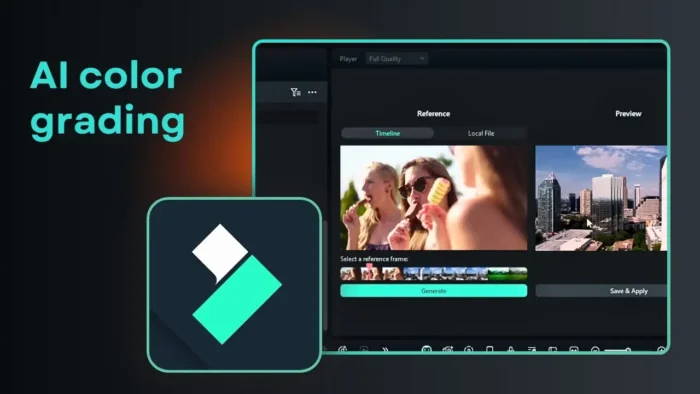
Here’s where the AI comes in. Sometimes you have two clips that just don’t match—a warm, orange-toned shot next to a cool, blue one. It’s distracting. Filmora’s AI color palette can fix this in seconds.
Select both clips, open the color menu, scroll down to the AI color palette, and pick which clip you want to copy the style from. Hit generate, and the AI analyzes the colors and applies the look from one clip to the other. Suddenly, both clips feel like they’re from the same scene. It’s almost magic. 🔥
This is a lifesaver if you’re editing together footage from different cameras or lighting setups. The result? Your video feels way more consistent and pro.
If you want to learn more about color grading basics, check this Filmora color grading guide.
Quick tips for experimenting with color grading
- Don’t be afraid to play with the sliders. Sometimes you get unexpected results that just work.
- Use the before/after preview to see what’s actually changing.
- Save your favorite settings as presets for quick use later.
- If you mess up, just hit reset and start over.
- Every video is different, so trust your eyes and go with what feels right.
When to use basic vs advanced vs AI
| Situation | Best Tool in Filmora |
|---|---|
| Quick fix, beginner | Basic mode or presets |
| Want a movie-like style | LUTs |
| Need to match clips | AI color palette |
| Specific color tweaks | Advanced controls (HSL, color wheels) |
If you’re just starting, stick with the basic mode and presets. As you get more comfortable, try out LUTs and the advanced tools. The AI color palette is awesome for keeping everything consistent, especially in longer videos.
Keeping your workflow smooth
Color grading can get overwhelming if you overthink it. My advice? Start simple, see what works, and only dive into the advanced stuff if you need it. Filmora gives you the flexibility to go as deep as you want.
Want to add more creative effects? Learn how to blur faces in Filmora or add transitions for a polished finish.
FAQs
How do I apply a preset in Filmora?
Just select your clip, go to the color tab, and pick a preset. One click and it’s done.
What’s the difference between a preset and a LUT?
Presets are simple, built-in looks. LUTs are more advanced, often used in movies, and can be downloaded or created for specific styles.
Can I match the color of two clips automatically?
Yes, use the AI color palette. Select both clips, choose your reference, and let the AI do the work.
Is advanced color grading hard to learn in Filmora?
It’s more detailed, but you can start with the basic tools and move up. The advanced options give you more control if you want it.
Does Filmora support custom LUTs?
Yes, you can import your own LUT files if you want to use a specific look.
Ready to make your videos pop? 🎨 Try out these tools and see how much better your edits can look. And if you want to keep leveling up your editing, check out more Filmora tips here.

