Key takeaways:
- Filmora 14 has two main ways to clean up audio: normal noise reduction and AI voice enhancer
- AI voice enhancer gives better results for most voices, but you can tweak both methods
- Don’t crank noise removal to 100% or you’ll lose voice clarity
Intro paragraphs:
Background noise can mess up your audio, especially if you’re recording in a noisy spot. If you want your voice to sound clean and pro, Filmora gives you a couple of solid tools to fix that. I’ll show you how to use both the classic noise reduction and the new AI voice enhancer, so your audio sounds way better and your message comes through loud and clear.
If you’re tired of hearing fans, traffic, or random chatter in your videos, you’re in the right place. This guide breaks down every step, so even if you’re new to Filmora, you’ll get crisp audio in no time.
Table of Contents
- Picking Your Audio Segment and Getting Started
- Using the Classic Noise Reduction in Filmora
- AI Voice Enhancer: The Next-Level Option
- Comparing Classic Noise Reduction vs AI Voice Enhancer
- Tips for Getting the Best Results
- Other Useful Audio Settings in Filmora
- Quick Troubleshooting
- Exporting Your Clean Audio
- FAQs
- How do I find the noise reduction tool in Filmora?
- Should I use both noise reduction and AI voice enhancer at the same time?
- What’s the best setting for noise removal?
- Why does my voice sound robotic after removing noise?
- Can I use these features in older versions of Filmora?
Picking Your Audio Segment and Getting Started
First thing, load up your project in Filmora and pick the audio or video clip you want to clean up. Doesn’t matter if it’s just audio or a full video—the steps are the same.
Click the clip, then look to the right side of your screen for the audio settings. If you’re using Filmora 14, you’ll see all the latest features. If you’re on an older version, you’ll still find the basics, but some options might look a little different.
Using the Classic Noise Reduction in Filmora
Scroll down in the audio settings until you find the noise section. Here’s where you can turn on the standard noise reduction. It’s super simple—just flip the switch and set the strength.
- The default level is 50%
- You can slide it down to make it weaker or up to make it stronger
- No magic number—play your audio, tweak the slider, and see what sounds best
If you set it too high (close to 100%), your voice will start to sound weird and lose detail. I usually keep it under 50% unless the noise is really bad. Play around and compare before and after to see what works.
For outdoor recordings, you might want to turn on wind removal too. There are a few other settings like reverb and hiss removal, but honestly, most people won’t need those unless you’re using a super sensitive mic.
Want to know more about basic audio tricks in Filmora? Check out how to blur faces in Filmora or how to add text in Filmora.
AI Voice Enhancer: The Next-Level Option
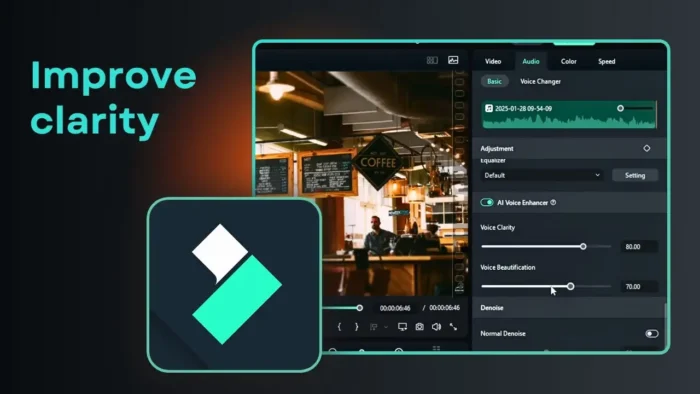
Now, if you want your voice to sound even cleaner, Filmora 14 has an AI voice enhancer. This is where things get cool. Turn off the regular noise reduction first (don’t use both at once), then flip on AI voice enhancer.
You’ll get two sliders:
- Voice Clarity: Makes your voice stand out more, kind of like noise reduction but smarter
- Voice Beautification: Gives your voice a richer, more studio-like sound
I usually start with the default settings and play my audio. If it sounds too processed or not like my real voice, I dial back the beautification slider. If there’s still some background noise, bump up the clarity slider a bit.
The AI tool is way better at keeping your voice natural while cutting out noise. Just don’t overdo it—if you max out both sliders, your voice can start to sound robotic.
Comparing Classic Noise Reduction vs AI Voice Enhancer
Here’s a quick table to show the difference:
| Feature | Classic Noise Reduction | AI Voice Enhancer |
|---|---|---|
| Removes noise | Yes | Yes (smarter) |
| Voice clarity | Can get muffled | Stays natural |
| Easy to use | Super simple | Just two sliders |
| Customization | Single slider | Two sliders for control |
| Best for | Mild background noise | Heavy noise, better voice |
For most situations, I stick with the AI voice enhancer. It just sounds more natural and does a better job, especially if your recording has a lot of background stuff going on.
Tips for Getting the Best Results
- Always test different settings and listen to your audio before exporting
- Don’t push the sliders to the max—find a balance where your voice sounds real
- If your audio is still rough, try recording in a quieter spot next time
If you’re editing a lot of videos, you might want to see how to improve video quality in Filmora too.
Other Useful Audio Settings in Filmora
Beyond noise reduction and AI, Filmora gives you a few more options:
- Volume adjustment: Boost or lower your audio
- Equalizer: Shape your sound for more bass or treble
- Fade in/out: Smooth out your audio transitions
You can stack these with noise removal for even better results. For more advanced tricks, see audio crossfade effect in Filmora.
Quick Troubleshooting
If your audio still sounds off:
- Make sure you’re not using both noise reduction and AI at the same time
- Try lowering the noise reduction if your voice is getting cut out
- Use headphones to check for subtle noise you might miss on speakers
If you’re running into software issues, like Filmora crashing or lagging, check how to update Filmora or how to know if Filmora is registered.
Exporting Your Clean Audio
Once you’re happy with the sound, just export your project as usual. The noise reduction or AI settings will be baked into your final video.
If you want to record your screen and audio together, see how to record desktop screen in Filmora.
FAQs
How do I find the noise reduction tool in Filmora?
Click your audio or video clip, go to the audio settings on the right, and scroll down to the noise section. The switch is right there.
Should I use both noise reduction and AI voice enhancer at the same time?
Nope, just pick one. Using both can mess up your voice and make it sound weird.
What’s the best setting for noise removal?
There’s no single answer. Start around 30-50% and adjust while listening. Too high and your voice will suffer.
Why does my voice sound robotic after removing noise?
You probably set the slider too high or stacked too many effects. Dial it back until your voice sounds normal.
Can I use these features in older versions of Filmora?
You’ll get basic noise reduction in older versions, but the AI voice enhancer is only in Filmora 14 and newer.
🎧🧑💻

